
Heat sources for our skoolie have been a highly researched topic for us. As we have discussed in a previous post, Tips for Heating a Skoolie Conversion, we discussed how we would follow 70 degree weather. Well, we were shocked right away. Our first two nights were cold and it even snowed. Long before we installed the diesel air heater we tried many different things. We started with a Hunting Buddy Heater which is a propane heat source. That was our very first heater. We closed off the front portion of the bus with a blanket and used the heater in the rear of the bus where we slept. After it snowed we realized we needed another source of heat so we purchased an electric quartz heater. These worked in a pinch, but they both have their negatives. While staying in Texas last winter we primarily used the propane Buddy Heater and would also use the quartz heater on really cold nights.
Condensation
Propane heat produces condensation inside a bus mostly on the single pane original bus windows. Even covered with Reflectix, they still had condensation on them. We would constantly have to clean them to prevent mold issues. The quartz heater required us to our generator because of the power draw it had. It was also big and bulky. On the plus side it produced a dry heat, but with us being off grid with no electrical hookup it was not ideal as a stand alone heat source.
Why We Chose a Diesel Air Heater
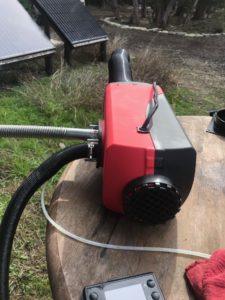
We originally wanted a wood stove installed and went back and forth several time on this idea. They are aesthetically pleasing and produce a dry heat, but the size of the stoves required constant attention especially at night loading more wood into the stove every few hours. We kept reading about this on blogs and we quickly changed our minds. A lot of people posted about diesel air heaters and using them with success. When I did my initial research, I found the major brands Planar, Espar, and Webasto all had great reviews but were pretty expensive. During this time, I started reading about people using the Chinese diesel air heaters purchased off of Amazon or Ebay. I was initially skeptical, but these heaters have a big following in Europe. I researched a lot of different models/brands by reading reviews and seeing what each unit came with. These traditionally come in 2kw, 5kw, and 8kw base models. After that, the biggest differences are what it comes with. We went with a 5kw model and placed it in the back half of our bus. Our original plan was to use try in the back of the bus where we slept and potentially adding a second one up front at a later point.
Our diesel air heater was around $130 at the time and I probably have another $150-$200 in parts, accessories, and tools to install this unit. This unit had great reviews and came with a digital control panel and most of the necessary items to install. As I will state later, I did purchase a different fuel tank, a floor bracket for safety reasons, and a longer piece of ducting needed for our particular install. I still came out way cheaper than buying a name brand heater.
Prep Work
During the planning phase of the bus build we decided to keep the original floor heaters the bus came with that use engine coolant to heat. We thought we needed these for running. The truth is we never used them and in fact started to leak a little bit. They are not worth the hassle to keep. Take them out when you are in the demo phase. So with that said, we had to remove both heaters that had coolant in them and in the lines. Long story short, no matter how much you plan to contain the mess, you have to cut the lines, plug them, fish them through the walls, remove them and loop the coolant lines. It was carefully orchestrated and still messy in a finished bus. On the plus side we gained extra storage space under the fridge because of this.
Installation
With the original bus heaters removed, I was now ready for the install. One thing that everybody on the diesel heater forums recommended was bench testing the diesel air heater before you install to make sure everything worked. So, I set everything thing up outside on a table and proceeded to start it up. It worked great. I tested it at different temperature settings and I was really surprised by the heat it put out.
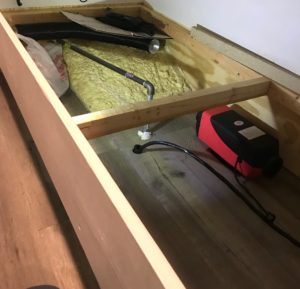
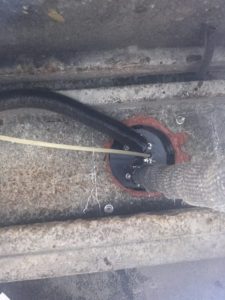
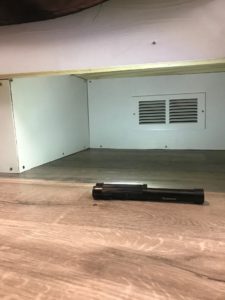
Now I was ready to install it in the bus. After figuring out where you will put the heater, the first thing to do is cut the hole in the floor. Another key tip from other users is to use a floor mount bracket made from metal to keep the hot exhaust away from the wood subfloor. This requires a five inch hole to be cut in the floor. I used this model of floor bracket and it worked great. Now you can attach the heater to the floor bracket and bolt the whole thing to the bus floor. I did use a high temp RTV sealant between the bracket and the floor as an extra precaution.
Next you need to install your fuel line and fuel pump close to your fuel source. Our heater did come with a fuel tank but it did not fit in the location I had available for it. You can also run a fuel line to your main bus diesel tank, but I did not have enough space to attach the fittings without having to remove the fuel tank. Our fuel tank is 100 gallons and almost full, so this was not an option. I researched this more and came up with using a portable marine fuel tank. I actually found someone else doing these and they had great results. So, I purchased a three gallon marine fuel tank the proper quick disconnect fittings, female and male, and fuel tank tie down strap. This tank allows me to place it in our storage bay under the bus and remove it to refuel it.
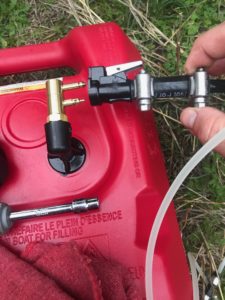
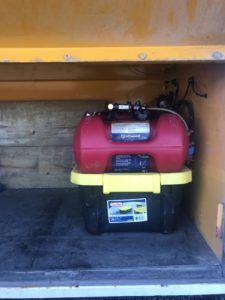
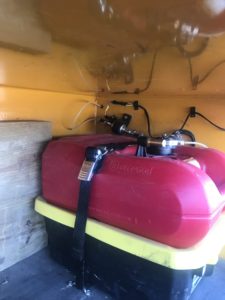
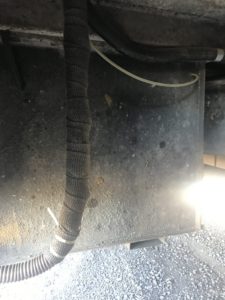
Our fuel pump is also located in the storage bay with with tank, which helps to reduce the noise from the pump to the inside. Next you will connect the power to the unit which is really easy. The power connections to the control panel and fuel pump are plug and play with only one main set of power wires going to my main power center. Due to the length of the run from the heater to the power center I used a heavier gauge wire. This system has worked out pretty well. Lastly, you will need to install the exhaust. It is also recommended to wrap the exhaust pipe in high temp exhaust wrap to reduce temperatures on surrounding items. The exhaust gets very hot and this wraps from our experience works very well.
Finishing Touches
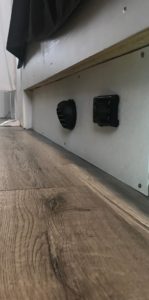
To complete the install under the bottom bunk, I enclosed the area underneath to have a place for a fresh air intake vent and hot air out vent and mounted the control panel. The fresh air intake vent is important because it needs this to work efficiently. It also provides a small storage space.
Initial Impressions
Our diesel heater was installed at the end of last winter and have not had multiple days of constant use, we have used it for cold mornings and it puts out a lot heat quickly. In fact, we are even thinking one heater might work by itself and add more duct work to the front part of the bus to heat both places at the same time. Our heat vent swivels so we heat the rear of the bus first early in the morning and then point it towards the front after we get up for the day. We don’t have a real good basis for establishing fuel consumption under a constant multi-day use but it has done very well for the use have it put it through. We also love that it’s produces a dry heat and greatly reduces condensation. It also draws minimal power. We have used it a lot in the mornings lately in the Pacific Northwest and we are totally off grid.
How it Works
A diesel air heater uses a glow plug to burn the diesel fuel that produces a heat. The heater draws air from the outside to the heat chamber and hot air is blown out via an internal fan. Our heater model comes with a digital control screen that runs everything. I can control the fuel rate and the temperature. I can even have it set on a timer to come on. Once I turn on the unit, I select a desired temperature and you will hear a thumping of the fuel pump a feel the fan blowing out air automatically. This start up mode is when the unit draws the most power heating up the glow plug. Once it reaches the desired temperature it only blows the fan until the temperature drops to desired level. It does not work like a thermostat at home. It will not shut off and turn back on. This takes a little to get used to. It also only displays the temperature in Celsius not Fahrenheit. For the price, this is not a deal breaker. When we want to turn off the heater, I will increase the heater setting to a higher temp. This keeps it from sooting up on the inside. After about five minutes I turn the unit off at the console. In the off setting the control display is still active drawing power. To eliminate this power draw and accidental heater turn on, I have installed a switch next to the batteries that kills the power to the unit.
